Friday, May 11, 2012

Easy Peasy Chocolate banana bread

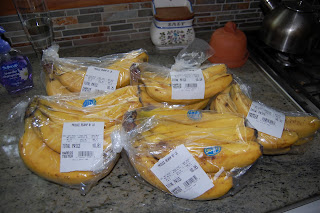
As I said, last week, I will detail how I make the chocolate banana bread after I bought this many bananas:

It is so simple really and truly. Of course, like always, having the right tools make it easier, but you could even mix this by hand pretty quickly. There's a reason it's called quick bread!

The recipe below is for 3 loaves of bread. As always, I feel it's worth my effort to make bigger batches because it takes just as long (or about) to make 3 loaves as it does one, so why make just one?

On the day I actually made these, I made 6 loaves of this particular bread, but I did it in two batches as my mixer and blender couldn't handle bigger batches than that. My blender is a large vitamix blender and my mixer is a 6 quart Kitchen aid mixer (though from now on I think I'll use my 8 quart mixer - I really do like the Electrolux DLX mixer much better for almost everything).

The recipe is from "Baking Illustrated - the Practical Kitchen Companion for the Home Baker" by the editors of Cooks' Illustrated Magazine.  I love this cookbook, by the way. If you want one really good baking cookbook with truly tried and true recipes, this book is more likely to hit the nail on the head than most other baking cookbooks - especially with the sheer volume of known/common recipes.

Of course, as always, I tweak it and make it easier for me, but you can stick to the recipe in the book if you prefer.  This is how I did it:

Chocolate Banana Bread:
  • 3 9x5 loaf pans
  • 6 cups (30 ounces) unbleached all-purpose flour
  • 3/4 cup unsweetened cocoa powder 
  • 2 1/4 cup granulated sugar
  • 2 1/4 teaspoon baking soda
  • 1 1/2 teaspoon salt
  • 9 (approximately) ripe, soft, speckled large bananas, mashed well (4.5 cups mashed is a more accurate measure and what I use, instead of number of bananas. If you don't have enough bananas like short one or two, add a bit of applesauce to supplement to make up 4.5 cups total).
  • 3/4 cup plain yogurt
  • 18 tablespoons (2 sticks plus 2 tablespoons) unsalted butter, melted and cooled slightly - I put it in the microwave for 1 minute at 50% power and it comes out mostly melted with some very soft butter left unmelted.
  • 3 teaspoons vanilla extract
Position the oven rack to the middle position. You will fit all 3 pans on one shelf.  Preheat your oven to 350 degrees. Grease the loaf pans and dust with flour, tapping out the excess (or use a baking release spray).

In your mixer, mix together all the dry ingredients (flour, cocoa powder, sugar, baking soda, salt) like this:


Then, in your blender, first mash the bananas (liquify). I do it with 8-9 bananas first and then see if I need to add more to get to 4.5 cups total. Like this:


I then add all the rest of the liquid ingredients (eggs, yogurt, melted (mostly) butter and then whir it together:


I then add the liquids from the blender into the dry ingredients with the mixer and mix until just combined. I scrape it down and mix again and in the end. (As this mixer never seems to get the bottom, I mix a couple turns by hand.)


I then pour it evenly into the three loaf pans. It will fill the pan to about 2/3s. I first show it in my preferred loaf pans - metal. Glass is OK too.

But, since I made two batches of this, the second batch I used three different pans when I mixed up the next batch while this were baking. In this next batch, I had one of my preferred pans left, a glass pan and a silicone pan. The glass and silicone pans are my mother in laws which she had before moving in with us.

As I said, glass is OK, but silicone? I don't like silicone baking pans. Yes, they don't stick. Yes, they are light and easy, but they are too floppy and the bread will get a bit malformed, so it doesn't look as nice. You can see it a bit when it is ready to go in the oven:

 But you can see even more after it's baked. See how it bulges at the sides?


And how they look when it's all done and is cooling:


I still had some bananas left over, so tomorrow, the banana blueberry bread which we love the most of all these banana breads:


Wednesday, May 9, 2012

Why do I feel guilty? Or bad?

I have been wicked busy the last few days - no time for any baking at all. So, I bought whole grain bread for my husband and twice now potato bread for my younger son this past week and I bought store bought cookies for the kids to snack on (Newtons).

I feel bad I couldn't fit it in. And I don't know if I like it that the kids prefer the store bought crap. My younger son loves, loves, loves the soft squishy breads like Martin's Potato Bread.

And then there's my teen. I just had to laugh at him though when he said it. We were in a Sunday School graduation meeting and he requested donuts as his food choice for the party. Donuts. His mother makes all sorts of baked goods and he wants this:


I asked him about it later in a joking way and he said, "Sometimes I just want pure junk food." Well, what can I say to that? I just had to laugh, but I do feel a bit guilty when I buy commercial bread and cookies and I'm not quite sure why! And I'm not sure how I like them preferring pure crap when given a choice.

Tuesday, May 8, 2012

While we're on salsa - mango salsa!

This is another recipe I've changed. I know I saw it originally in a pamphlet or cookbook from Weight Watchers to be paired with salmon. It was so good that now whenever it's mango season (May), we make this a few times.

In our house, we always buy fish on Sunday while we are in northern Virginia and have access to good fish. We then either eat it Sunday night or more commonly, Monday. It fits nicely with the garbage pick-up on Tuesday. That means no stinky fishy smell in the house!

While at Whole Foods, I saw they had mangoes on sale and they were ripe. We were already planning on getting salmon as our grill needs repair and salmon is one of the best fishes for the oven. And I've already said that salmon and mangoes go very well together.

So, what I did. First I prepped the fish. I used a lime sliced across top, drizzled olive oil over the fish and added a few red onion ringlets over the fish along with a pinch of salt and a bit of fresh black pepper.

Then, while that was cooking, I made the salsa.  Here are the ingredients:

6 small mangoes (or 3 of the larger variety). Smaller ones are more likely to be ripe and soft.
3 limes (squeezed for their juice)
1 red pepper
1 green pepper (or two of the same kind - whatever sweet peppers you want to use)
1/2 red onion (or less)
1 small bunch cilantro
1 teaspoon of salt.

This will make about 6 cups and with our family of four eaters of this salad? I could double it and it might still not be enough. It is yummy and light and fresh!

Remember, I am the queen of no waste. So, I still had that 1/2 a bunch of cilantro from the other day. I trimmed off the ends and used the rest. The peppers I cut and sliced and then cut down to dime size pieces. I coursely chopped the 1/2 onion. The mangoes I peeled and pitted and cut into quarter size pieces. I chopped the cilantro and then squeezed the lime juice from the 3 limes over top and added the salt and stirred.

Serve fresh just like this.

If you aren't a fan of cilantro, you can skip it. We just like it best with. Bon appetit!

Monday, May 7, 2012

Fast and simple homemade salsa

When I was in Mexico as a student, I got to taste a lot of wonderful, homemade Mexican cuisine. The foods are fresh, crisp and light and simply wonderful - not like what we think of as Mexican food typically in the USA. Americans think of tacos in hard shells with sour cream and lots of cheese or huge burritos with tons of meat and cheese and cream. Those are American takes of the cuisine, but like most things, it's just the tip of the iceberg.

When I came back from Mexico - with a few recipes from the woman I was living with and some experience at a great restaurant in Chicago, Frontera Grill (neighbor restaurant of the famed Topolobampo restaurant both run by Rick Bayliss), I set out to learn to make a lot of classic and modern twists of Mexican cuisine. I use a lot of fresh veggies in a way that is so tasty and so good for you and one of those things I learned to make was homemade salsa.

In Rick Bayliss's cookbook, Rick Bayless's Mexican Kitchen: Capturing the Vibrant Flavors of a World-Class Cuisine, he details a lot of simple, rustic recipes. I use a lot of them as is, but over time I simplified a few - like his salsa. At first I roasted the veggies and so on, but later I just threw it all in a food processor and called it good for a 5-10 minute salsa that rivals the best you will ever taste in a restaurant and is leaps and bounds better than anything from a jar.

This weekend, for Cinco de Mayo, just for fun, I decided to make a Mexican feast. It also marked 17 years (and one day) since I spent a summer in Mexico. As always, in the kitchen I am a whirlwind - a force to be reckoned with. I have a system and I'm speedy, so stopping to take photos is a challenge for me, but I did it - with the iphone, but that's better than nothing.

So, here is what I do for a quick homemade salsa that makes about 3 cups. Most of the time I make a mild salsa as my mother in law who lives with us can't take any heat in her food, but the only thing you would do differently from below would to be add one to two cored and seeded jalepeno peppers to the ingredients.

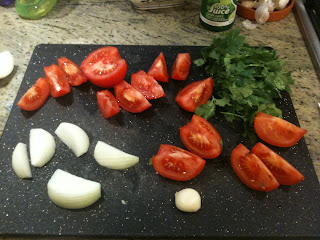
So, here are the ingredients:

  • 3 ripe medium sized tomatoes (or 2 pints of cherry tomatoes - or whatever tomatoes you want to use) cut in wedges
  • 1 small onion or half a large onion cut in wedges (white is more authentic - but they are really large, so use 1/3 to 1/2 of one of those)
  • 1 bunch of cilantro, washed and trimmed
  • 1 large clove of garlic
  • 2 tablespoons of lime juice (fresh is best, but bottled works - lemon juice will work in a pinch)
  • 2/3s of a teaspoon to 1 teaspoon salt
  • 1-2 cored/seeded, quartered jalepeno peppers (optional and not pictured)
I love working with cilantro as it smells so fresh and unlike most herbs, you can and should eat the stems. Parsley you need to take off just the leaves - not so with the cilantro - you just wash it up and cut off how much you need. Typically, bunches are small, so I use the whole thing, but last night I had a large bunch, so I cut off the top half.

I cut the tomatoes and onion (peeled and trimmed) in wedges, peel the clove of garlic and wash and trim the cilantro to the right size:


This is what I had leftover from the top photo (more cilantro and a bit of onion);


I then put it in the food processor. The order of putting them in does matter. You want your spices on the bottom as it's important to get them thoroughly minced, so place the garlic and optional quartered jalepenos in the bottom, then distribute the cilantro over that, ending with tomatoes and onions on top. Like so:


You don't want to liquify it, but you do want to make the chunks fairly small. It will look like this when it's done:


Then add the lime juice and salt and stir it up all up to distribute:


The one caveat of homemade salsas is that they are good then and there. They do not store well as a fresh salsa; however, they do cook well in either a spanish rice, with ground meat, or a a sauce to simmer chicken. Just make a fresh batch every time you need it for tacos or nachos.

I also make a salsa verde and this one you can freeze. I'll detail that one some other day.

Saturday, May 5, 2012

When life hands you bananas, make banana bread!

At one of our local grocery stores they will repackage produce that is slightly damaged or left over for a much reduced price. I always look on that cart to see what I can find. This past week I got 3 pounds of baby portabello mushrooms for $1.50 total, a bunch of red peppers for 75% off and bananas. I bought 13 pounds of bananas (and I didn't even take it all) at 30 cents a pound when normally they are 69 cents a pound. They weren't overripe yet either - just a nice yellow - ready to use.


And just for fun, the mushrooms which I have used in salad, stir-fries and today some spaghetti sauce:


I have used the bananas for chocolate banana bread (6 loaves). Resulting usage and leftovers shown here:


And then I made banana blueberry bread and in the end, I used this many bananas:

And I had this many left over for the early part of the week to use in yogurt smoothies and the last of it in this morning's pancake batter. Not a single banana of the 13 pounds wasted.


The secret of saving money with baking, cooking in general is to think/bake/buy flexibly. I never buy that many bananas at full price. I wait and watch and then I buy a bunch and then freeze the leftovers. Same with tomatoes and those mushrooms, etc. While I don't believe in couponing for the most part (as I'm not a prepackaged kind of gal), it does pay to watch for sales in the produce section and then devise a plan of how to use those items.

This past fall there were a ton of tomatoes being sold at 15 cents a pound. 15 cents!!! I bought them all, blended them whole in the blender and then cooked them down a bit and then froze them. I take them out one container at a time for spaghetti or whatever and it tastes so much better than the canned tomato sauces and it was much cheaper. 6 months later and I still have a few containers left.

So, when life throws you bananas for cheap - buy them and make a plan. I will detail in the next few days what I made with these bananas, but it made 10 loaves of quick bread, two batches of smoothies. a couple cut up in cereal and the last was part of a big batch of pancakes. 4 went to teacher's for Teacher Appreciation Week (sent in with Henry on Friday so the teachers could enjoy it with their families over the weekend - the actual TAW starts next Monday). Two are being eaten at home now - one blueberry banana and one chocolate banana and the other 4 are in the freezer to be taken out when we need a snack food. And they are quick recipes which is an even bigger bonus!


Friday, May 4, 2012

Making your own yogurt

Yogurt was one of those things that I just thought was some difficult process that only could be done under ideal conditions with funny enzymes, etc. Like making cheese, but it turns out, yogurt is extremely simple to make. It's now one of those things I wonder why people buy. I can make it for 50% - 75% of the price of buying it and it takes about 15 minutes of my time - that's it.

I went the easy route with making yogurt. I decided to buy a yogurt maker. Yes, it will take time to recuperate the cost, but after 2 months of making yogurt at least twice a week, it's paid for itself. You can make yogurt even cheaper by doing it one of several methods detailed here: http://www.makeyourownyogurt.com/ and here: http://www.wikihow.com/Make-Yogurt.

I didn't want to worry about my yogurt getting too hot or too cold, so I went with the yogurt maker. I bought that one, but there are a ton of them. There are those that will even make them in individual batches, but for my family that wasn't practical, but it might be for you. Look around and see.

So, on to making yogurt. It is ridiculously simple. This is what you will need for the fast and simple methods I use:

1 large double boiler (I do it by putting a metal mixing bowl over a large pot on the stove).
1 large pot for an ice bath.
Ice for the ice bath
1 food grade thermometer that will register as low as 100 degrees fahrenheit and up to 200 degrees fahrenheit (comes with the yogurt maker I bought).
A yogourmet yogurt maker.
1/2 cup yogurt starter (organic whole milk or 2 % yogurt) for the first time, reserved 1/2 cup homemade yogurt from then on.
A container to store your yogurt.
2 quarts organic milk - has to be at least 2% milk or Whole Milk - it can be ultra pasteurized to get a semi-firm yogurt, but you can use Skim milk for a more liquid yogurt.

That's it!

So, this is how you start. First, plug in your yogurt maker and adding water to the level it indicates.

Then you create your double boiler, making sure the water in the bottom pot does not touch the top pot/mixing bowl. Put it on the stove and start the heat on high. Add the milk. I do the entire 1/2 gallon at a time. Cost of a half gallon of 2% organic milk in these parts is $3.99. If I buy a gallon and use half of it for this batch, it works out to be  $3.18 per half gallon.


Meanwhile, measure out 1/2 cup of organic whole milk or 2% milk yogurt and put it in the base of the inner container of the yogurt maker. Do this early so it has a chance to warm up so it won't cool down your warm milk too much later. Remember, you only need to buy a yogurt starter once. After that, just use your reserved homemade yogurt.

Heat the milk until it reaches 185 degrees.  Going higher won't harm anything. Why to at least 185 degrees? It kills off any harmful bacteria. By the way my thermometer came with my yogourmet yogurt maker.

Then take the hot milk from the double boiler and set it in an ice water bath, stirring it frequently to distribute the hot/cold milk.

Cool it to 110 degrees and then promptly remove it from the ice bath and put it in the inner container of the yogurt maker. This particular thermometer shows in green when you've hit the safe temperature for adding the live yogurt culture.


Once the milk is in the inner container of the yogurt maker, stir it all together to mix in the yogurt culture and the warm milk. It will look just like frothy milk because that's basically what it is.

 Place the lid on the inner container and set it in the yogurt maker. If your kitchen is cooler, 70 degrees and cooler, put the outer lid on the machine.

If your kitchen is warmer than 70 degrees, keep the outer lid off - The lid can make the water bath warmer which might be too warm for a warm kitchen. You don't want to kill your yogurt!


Now, how long you cook it/ferment it really depends on you. You need at least 6 hours, but you could go as long as 12 hours. It really depends on how tart you want it to be - how much of the milk you want to turn into yogurt. We seem to like fermenting the yogurt for 7-9 hours. This would be an easy thing to do in the morning - get it set up and let it ferment while you are at work, or conversely, set it up before going to bed and put it in the fridge when you wake up.

When it is done, it will look kind of like sour milk looks like if it's been sitting out for a long time (we've all seen really sour milk, right?). It will have water all around it and will look like a solid glob. Just smell it. It should smell like warm yogurt. Its' all good!

 Stir it up and refrigerate it in the same container, or pour it into another container. We like this one. Refrigerator for at least 4 hours to chill and deactivate the yogurt culture. Chilling overnight is best.

I always reserve a 1/2 cup (or so - I don't measure) in the smaller inner container for the next batch. For my family of 5 we go through a gallon of yogurt a week (at least), so it stays fine in the big container. if you make it less frequently, you might want to store it in a measuring glass or a bowl.

The reserved yogurt:


And how long does it keep? For 2 weeks.

Is it different that store bought yogurt? Yes, it is - even the organic stuff. Americans have gotten used to scoopable yogurt. We are used to eating it from a spoon - kind of gelatinous and that's because they do add gelatin to the yogurt to make it firmer. The rest of the world drinks their yogurt. If you make your yogurt with whole milk, it will make a firmer yogurt. The 2% yogurt will be more liquid like, but stiff fairly firm. For pouring, we have to shake the container to break up the clumps.

You really can't make homemade yogurt with fat free yogurt and make it somewhat firm. It would be too liquidy, but would still be great in smoothies and cereal which is how we use it.

And, if you want to make Greek yogurt, all you have to do is strain it (bag for this comes with the yogourmet yogurt maker). Again, half the cost.

And let's talk about cost.  It cost $3.99 in my area to buy organic yogurt - one quart. It cost $3.17 in milk to make 2 quarts of yogurt. And it took 15 minutes of my day to do it. In a week in our family that saves us over $6 in yogurt alone. That's $24 a month to make it ourselves. As you can see, the yogurt maker paid for itself in 2 months in our house. Less, if you count that I would have needed to buy a thermometer if I would have decided on a different method of making yogurt.

Other benefits, of course, are that it uses less containers, stays fresh longer and no funny business of added ingredients (gelatin) - even in the organic varieties of milk.

I have yet to make Greek yogurt, but that's expensive! You can make it for 1/2 the cost with so little time commitment or skill. Why not make it yourself? There are directions and a linen bag with the yogourmet maker to make Greek yogurt  - it just takes a bit of time.

Thursday, May 3, 2012

Proofing bread in a basket

You don't need a special, fancy basket to proof bread. I had this bread basket from somewhere (has since disappeared at some event) that I sometimes proofed bread in. The key is using a tea towel dusted with rice flour.

Why a basket instead of free form, letting it rise the entire time as a round ball? Well, some breads just don't rise "up". They are more likely to flatten out and turn into a flattish disk instead of a roundish, full ball. Every dough behaves differently. For the Pain de Campagne bread I make, it just can't hold up to rising on it's own without a basket. Other breads can. You have to experiment or follow the guidelines in the book

To proof bread in a basket, you treat it as if you were going to do it free form. You have to make the dough into a ball and tighten it to create tension on the top - keeping the seam tucked under. When you put it in the bread basket, you put the seam on top so that the unblemished side, the side with tension is forming along the basket walls. Hmm... showing that might need to be another post!

So, here it is proofing in a basket with a rice flour dusted tea towel. I have designated this tea towel for proofing only. You can also buy liners specially made for proofing baskets, but I don't see why.


As you can see, it's an ordinary, cheap basket. and a plain cotton, thin tea towel.

And the rising dough inside:


Now, the tricky part is getting this dough that is proofing onto the baking tray/cookie sheet. The best way I've found is to place the tray upside down (with parchment paper or with a silicone baking mat to prevent sticking) over the basket and then flip the whole thing over. This keeps the dough from getting too disturbed and deflating. Like this:


Now remove the basket. As you will see, you still get the design of the basket on the dough.


Now, simply remove the linen. It won't stick as rice flour really is like teflon.

Now, if you haven't over proofed your bread (let it risen too long) you can slash it. I like to use a sharp slightly serrated cheese knife for slashing. Why do you slash? Well, if you don't, the dough will/might explode from the side as it heats up. It needs to keep expanding and it will find the path of least resistance. If you slash, it will fill in there. If you don't it could do this:


Pain de Campagne won't do that if slashed on top. Or at least, it never has for me.

Here is the slashing:

Now, put it in your preheated oven and bake. Slashed part will fill in, but will leave a nice design.

Isn't that a pretty loaf?